
Dry sieve is a process by which the trichomes are broken off and sifted through a screen, allowing separation of the resin bearing trichomes from the plant material.
There may be an initial sieving, followed by subsequent finer sieves to further refine.
That can be accomplished a myriad of different ways, included but not limited to hand held screens in frames, tumblers, and vibratory dry sieving.
DIY Dry sieve frames and screens include hand held frames, as well as harvest boxes serving four or more trimmers, and typically more than one screen is used to extract and further refine the Kif.

Finished frame
Here is my simple frame that I designed to accommodate either stainless mesh for the first sieve, followed by properly tensioned silk screen finer meshes for further refinement.
The silk screen spline or stainless mesh are held in place with retaining strips, which are retained using brass wood screws. I cut the retaining strips at an angle matching the angle cut in the top of the frames, so that they nest snugly for storage.
Costs:
The unit cost per frame of course depends on your wood costs. For these frames, I scored 8′ finger grooved mahogany edge trim from a local company who re-cuts lumber and markets it. I paid $0.99 a stick, producing a per frame cost of about $0.50.
I used a hardwoods, because they are more dimensionally stable to hold groove width over time and they are tighter grained, so less prone to splitting.
I don’t care what kind, and keep my eye out for free hardwood pallets for components.
Equipment:
I typically cut the frame using just a table saw with a 1/8″ wide carbide blade. I have a big Craftsman, but for these frames I used a cheap portable from Home Depot that came with a 1/8″ blade.
Safety:
Lets discuss safety before turning anything on. It is critical that you be familiar with the safe operation of a table saw before proceeding, as they instantly remove digits, so must be used safely and with respect.
If you’ve never had professional instruction on how to safely use one, seek it before proceeding.
Besides using the saw fence and slide, use a pusher stick for anything near the blade and without fail wear safety goggles with adequate side shields.
Let me also share that the person teaching me to use a table saw in high school, didn’t have all his fingers, nor a did a number of master carpenters that I know, starting with my grandfather who was missing a thumb. A saw can snatch a digit in a heartbeat, usually after you become comfortable and complacent enough to take chances or for your attention to wander.
Profile:

Frame member profiles
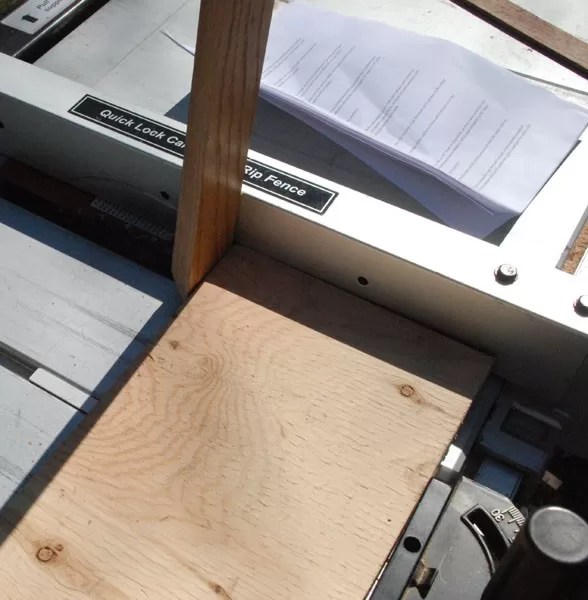
Let’s start with cutting frame and the retaining strips:
I cut the retaining strip material first, from the board I subsequently cut the frame from, so that the two angles match as a nesting feature. I use 22 degrees for that purpose.
I recommend using the fence and a pusher stick at the end of the cut, to guide the board through the saw.
The retaining strips are attached to the bottom of the frames with brass screws, so as to retain the stainless mesh or the silkscreen tensioning spline.

Cut retaining strip
Once the frame and retainer strips are cut, we cut the 1/8″ spline groove in the bottom, taking advantage of the 1/8″ blade blade width for the purpose.
Center the groove in the bottom of the board, using the fence and adjust blade height to 3/16″ above the table surface.

Cut groove

Radiused groove
I complete the frame board profile by adding a radius to the sides of the spline groove to facilitate smooth spline insertion.
I use a router with table, but you can chamfer it to remove the corner, or simply scrape the corners away with a sharp blade.
The object is to facilitate installation of the spline when tensioning the silk screen. They are hidden once the retaining strips are in place, so needn’t be pretty.

Radius using router table
Next cut the parts to length. I designed these 1 1/2″ deep X 10″ X 10″ screens to utilize existing material, but size dimension can vary to suit your needs.
As our frames are square, all frame and retainer strips are cut to exactly the same length, what ever it is, with the ends cut at a 45 degree angle.
The picture shows me using a table saw, but a miter saw also works.

Miter ends
After cutting the pieces to length, we cut the 1/8″ X 3/4″ deep slot in the center of each end. These slots accept the 1/8″ wooden keys during gluing to reinforce the corners.
Note the use of a pusher board to hold the frame member in a vertical position during cutting.
Cut slot

Corner key notch
Last we cut the retaining strips the same length as the frame parts, at the same 45 degree angle, and drill and counter sink three holes for #4 screws in them. Add one hole 1 1/2″ from each end, and one centered in the middle.
We are now ready to lightly sand and assemble! I use Elmer’s professional glue for the purpose, in conjunction with professional corner clamps for perfect alignment.
After apply glue to the ends and clamping them together, I smear glue on the corner keys and drive them into the slots to lock everything in place.

Glued and clamped

Drying
It is important to clean any excess glue, paying attention to the spline channel, before it hardens and increases the difficulty.
Once the glue dries, the excess can be trimmed away, along with the protruding corner keys, using a razor knife.
Carefully chamfer the inside corner of the spline channel using a wood chisel.

Clean groove
Use a countersink bit to pre-drill the holes for the retainer strips, so the screws install flush, without splitting any wood.

Drill and countersink
Selecting screen fabric:
The frames and components are now ready for assembly, which differs depending on whether it uses stainless or silk screen fabric.
I typically use a stainless mesh for primary sieving, or as a harvest screen for material handling, because of its durability, and silk screen for further refining the kif, due to its better spring action.
For sieving purposes, we need a monofilament silk screen material, not twisted threads, to hold more consistent opening sizes between the threads, as well as being less prone to leave frayed fibers in the end product.
How to choose the proper micron size:
One micron size doesn’t fit all, and is selected for the task. Different strains also have different trichome sizes, so you may want to assemble a selection of frames for the refining steps.
Besides the initial sieve, we can further refine and classify it further into grades, by removing the immature kif heads and plant debris. We accomplish this by passing it through successive smaller mesh sizes and the best way to zero in, is measure them or through experimentation.
Measuring the trichome heads using an optical optical scale microscope is how I do it and here’s a picture of the inexpensive portable microscope that we use, which has an optical scale on the eyepiece for measuring fabric.
We typically use 150 stainless for the first sieve, and typically use 150 micron for that purpose and we prefer stainless steel for this task, to stand up to the harsher conditions of primary sieving.
150 microns is adequate for most mature trichome heads , and small enough block larger plant particle sizes.
We got our last order from Howard wire at $6.50/sq ft.

Measuring microscope
Refining the first sieve:
We typically use ~ a 130, 110, and 75 micron silk screen for successive refinement.
In Robert Clarke’s book Hashish, he suggested the following average trichome sizes when selecting pore size for assembling a selection of screens for refinement:
150 microns – large plant debris
130 microns – very large resin glands
110 microns – large resin glands
90 microns – medium resin glands
70 microns – small resin glands and debris
50 microns – very small debris and little resin
below that – very small dust and debris
Understanding the following mesh chart, requires that we not only consider how many threads or wires there are in a given space, but also how heavy the threads or wires are. Especially since often only the mesh or thread count is given.
In fact, with only that information, it not possible to determine pore size, because that number depends heavily on the diameter of the threads or wires used.
The attached chart shows average pore sizes by Mesh, which is the same as Thread Count, as well as micron sizes of the opening. You can calculate actual pore size as follows:
One (1) minus (Thread or Mesh X thread diameter), gives us the total of the open space per unit.
There is always one less openings than threads or meshes, thus dividing the total amount of open space by (thread or mesh count minus 1) gives us the individual opening size.
A micron is one millionth (10-6) of a meter, so we can convert our individual opening size to microns by dividing the answer in inches by .00003937.
IE: 200 mesh or 200 thread count by the chart below, depends on the thread or wire size to be .0021″.
1 – (200 X .0021″ thread diameter) = .5771″ Open space
Open space divided by (200 -1) = 74 micron Pore size
Pore size in inches divided by .00003937″ equals microns.
| MESH/THREAD | INCHES | MILLIMETERS | MICRONS |
| 3 | 0.2650 | 6.730 | 6730 |
| 4 | 0.1870 | 4.760 | 4760 |
| 5 | 0.1570 | 4.000 | 4000 |
| 6 | 0.1320 | 3.360 | 3360 |
| 7 | 0.1110 | 2.830 | 2830 |
| 8 | 0.0937 | 2.380 | 2380 |
| 10 | 0.0787 | 2.000 | 2000 |
| 12 | 0.0661 | 1.680 | 1680 |
| 14 | 0.0555 | 1.410 | 1410 |
| 16 | 0.0469 | 1.190 | 1190 |
| 18 | 0.0394 | 1.000 | 1000 |
| 20 | 0.0331 | 0.841 | 841 |
| 25 | 0.0280 | 0.707 | 707 |
| 30 | 0.0232 | 0.595 | 595 |
| 35 | 0.0197 | 0.500 | 500 |
| 40 | 0.0165 | 0.400 | 400 |
| 45 | 0.0138 | 0.354 | 354 |
| 50 | 0.0117 | 0.297 | 297 |
| 60 | 0.0098 | 0.250 | 250 |
| 70 | 0.0083 | 0.210 | 210 |
| 80 | 0.0070 | 0.177 | 177 |
| 100 | 0.0059 | 0.149 | 149 |
| 120 | 0.0049 | 0.125 | 125 |
| 140 | 0.0041 | 0.105 | 105 |
| 170 | 0.0035 | 0.088 | 88 |
| 200 | 0.0029 | 0.074 | 74 |
| 230 | 0.0024 | 0.063 | 63 |
| 270 | 0.0021 | 0.053 | 53 |
| 325 | 0.0017 | 0.044 | 44 |
| 400 | 0.0015 | 0.037 | 37 |
Mesh/Thread conversion to microns
Sources for components:
We get our stainless mesh from:
http://www.howardwire.com/stainless_steel_cloth.html
Another resource is: https://www.utahbiodieselsupply.com/stainlessmesh.php
Our polyester monofilament silkscreen comes from: http://www.silkscreeningsupplies.com/silk-screen-printing-mesh
Spline rollers and splines are also available from the above source, or use a 1/8″ window screen spline and roller may be used.
Assembling the stainless frame:
To frame a stainless mesh, we place the frame face down and lay the stainless mesh over the frame bottom facing you, aligning two edges with frame edges.
Install the top and side retainer strips in position on top of the screen, securing them with brass screws.

Install stainless mesh
Draw the screen taunt by pulling in in the opposite direction of the retaining strip at the top of the frame, and install the remaining two side screws.
Draw the screen taunt in the other direction, and secure it by installing the other two screws in the top retaining strip.

Stretch diagonally
Install the third retaining strip, attaching it with one screw, at the end with the corner that’s anchored.
Draw the screen taunt diagonally, to permit installing the last retainer strip and anchor screws.

Install third retaining strip
To install last retaining strip, attach it with one screw, starting at one end and then pull the screen taunt straight towards the retaining strip, to permit installing the remaining screws, starting with the end screw, followed by the center screw.

Final retaining strip installed
Use razor knife to trim off the excess mesh.

Trim
The completed screen:

Completed screen
Installing silk screen mesh:
Place the frame face down and lay the silk screen over the bottom facing you, with it extended beyond the outside frame edges.
Start the spline in one corner, and roll it in an inch or so, leaving enough extra spline to reach half way to the opposite side.

Installing corner
Wrap that short length of spline around the corner, and roll it in. Use your other hand to tension the silk screen.
Silkscreen is stretchy, so tensioning is an important step, as it affects pore size and shape. I like it taunt enough to bounce when I tap it with my finger.
The keen thing about using a spline, is that you can experiment until you get the results you covet. If you aren’t happy with the results, you can always pull out the spline back to the original corner, and start over again.
Roll the rest of the spline on the first side into place, and wrap it around the lower groove corner, holding tension on the silk screen in that direction.

Tensioning and rolling in spline
Roll the last side into place, and the corner wrapped, while holding tension on the silkscreen material in that direction with the other hand.
Roll the final strip of spline into place and cut it to length, while holding tension on the screen material.

Spline installed
Use a razor knife to trim off excess screen material:

Trim with razor knife
Install the four retaining strips using three #4 brass countersunk screws each.

Install retaining screws
Repeat for the other refining screens and with the stainless roughing screen, you are good to go. Ummmm except that the odds are high that you will want more, so the good news is that these puppies nest!
Here a dirty peeecture of a stack of different size mesh frames, which I made a top and bottom lid for the purposes of carrying them around. The range of meshes allows keeping a selection of different screens on hand for experimenting.

Storage stack
Moving right along with harvest boxes, here is one I whomped up, featuring a tray using a 130 micron stainless screen in the bottom, and setting a mirror.

Harvest box

Harvest box open
Mine is a rather tiny harvest box, compared to the 18″ X 36″ open suitcase size portable harvest boxes, which four trimmers can simultaneously use, and which folds up into a long suitcase for transport.
Although I no longer smoke, when I did I used to trim and break up but in the box, harvesting the kif off the mirror at days end. It was like found gold and never ceased to put a smile on my face!